Wednesday, January 27, 2010

Christmas Planning Binder

I know what you're thinking...She's one of THOSE crazies who thinks about and plans for Christmas all year long. And you'd be right! And you're probably also thinking Christmas was over a month ago! Let it rest for the next 11 months! And sorry, I can't! Go ahead and throw things at me if you wish, but I promise this post can make your life easier!

So, it's January and I'm already thinking about next Christmas. (I've even bought a couple of gifts already! Please don't hate me!) I know it sounds incredibly crazy. However, by planning for one of the craziest times of the year during one of the least crazy times of the year helps me to really focus on what I can do to make it as seamless as possible. During the first few weeks of the near year, I update my "Christmas Planning Binder", which is code for simple 1.5" notebook with dividers and is labeled appropriately.

You don't have to have a cute page in the front like I do, but I'm finding that the cuter I make things, the more likely I am to use them. So, thanks to some free digital scrapbook downloads and about 5 minutes of my time I have a nice little cover for my binder.


Inside, I keep all the Christmas planning/event supplies organized with labeled dividers.
In the Gift Ideas section, I keep tutorials for how to make homemade gifts and also magazine and catalog tear outs that contain items I might be interested in purchasing for a friend or family member.

In the Gift List section, I have a handy chart complete with the names of everyone that we purchase gifts for. This helps me to make note of ideas for that specific person, items already purchased and any type of budget for that person. This is just a simple chart I've made with the help of Microsoft Excel and can be done in a matter of minutes. Each year, I just print out a fresh copy.

The Cards S/R section contains a list of all the Christmas card recipients on out list. I have another handy Excel chart here to help me keep track of the cards we send and receive each year.

In the Addresses section, I have an address database containing all the names and addresses for the cards we send. In this section, I also keep a tutorial (thanks, Mom!) for how to properly complete the Mail Merge Action for Word/Excel so that I can print mailing labels to slap on the cards. This saves me TONS of time!

Under the Games tab I keep, you guessed it, games! I have copies of a couple of different Christmas themed games that I can use for parties or family gatherings. Games are a HUGE deal with our family at Christmas, so this section has proved to be helpful.

In the back of the notebook, I have several clear dividers to help keep something wrangled together. I have a divider for receipts that correspond with the items we purchase for gifts. I have a couple of dividers for Christmas letter stationery and mailing labels.
I also stash a little notebook paper in the back for note taking along with an ink pen.

I know this system won't work for everyone, but nearly every woman on my mom's side of the family has a binder like this and it's worked for us for years! So, take this time when Christmas isn't being jammed down our throats to thoughtfully plan and prepare for the most wonderful time of the year!

Do you already have a notebook of your own like this? How do you keep your Christmas plans and ideas organized? We'd love to hear your thoughts!

-Sarai
Posted by Picasa

Monday, January 25, 2010

More Soups For You

Because my husband was just returning from a week long conference last Sunday, we skipped out on our Sunday Soup Session. (See others here and here.) But this week, we were back in full force! For this week, we have 2 of our favorite soup meals on the menu: Turkey Chili and Gumbo. So, here we go...

I'd never had Gumbo until I met my husband. His family is from Louisiana and like any good Cajun family, they make a mean Gumbo! It's one of those meals that take a little time to prepare you feel like you're going to turn into Gumbo before you can eat it all! I'd like to say that this is some super secret family recipe that's been passed down through the years...and I guess it kinda is...except for that whole super secret part (this one comes from the back of a Tony's Roux Mix canister!).

Chicken Gumbo
*1 green pepper, chopped
*1 onion, chopped
*3 ribs celery, chopped
*1/4 tsp. minced garlic
*10 cups water
*1 cup Tony's Roux Mix (You should be able to find this at your local Wal-Mart of grocery store...check the spice aisle or the ethnic section. You know, because when I think "ethnic" I think deep south :) )
*2-3 lbs. boneless skinless chicken breasts
*1 lb. sausage link, cut into rounds

1. Saute vegetables until very soft.
2. Make roux with 2 (or more) cups water in large stock pot.
3. Add rest of water.
4. Add meats and bring to boil.
5. Add vegetables and simmer until chicken is tender.

And we always have our Gumbo with these Seasoned Saltine Crackers. They're great with Gumbo, other soups or just as a snack.

Seasoned Crackers
*1 lb. Saltines (4 sleeves)
*1 1/4 cup cooking oil
*1/2 tsp. cayenne pepper
*1/2 tsp. garlic powder
*1/2 tsp. black or white pepper
*1 tsp. crushed red pepper flakes
*1 pkg. ranch dressing dry mix

1. Mix all ingredients together, except saltines.
2. Place saltines in a sealable container (we use a gallon zip lock bag). Lay your crackers in the container so that, from the top, you only see the skinny side (edge) of the crackers.
3. Pour liquid mixture over crackers and seal bag or container.
4. Turn container over and over until mixture is absorbed. (We turn ours for about a day before we eat them.)

What would winter be without a big crock pot full of chili?!?! This lean version comes from a mailing from our local grocery store and is really tasty! Some cornbread muffins are the perfect addition to this meal..

Slow Cooker Turkey Chili
*2 cups yellow onion, chopped
*2 cups green pepper, chopped
*1 cup celery, chopped
*1/2 cup olive oil
*2.5-3 lbs. ground turkey breast
*4 Tbsp. chili powder
*1 tsp. cumin
*1 tsp. salt
*1 tsp. cayenne pepper
*28 oz. can crushed tomatoes
*6 oz. can tomato paste
*4 Tbsp. cilantro
*4 tsp. jalapenos, minced
*4 tsp. minced garlic
*1 can great northern beans, drained
*1 can chili hot beans, drained
*6 cups low sodium, fat free chicken broth
*shredded cheese and sour cream for serving

1. Chop onions, pepper, celery and jalapenos.
2. Heat olive oil in large skillet over medium-high heat.
3. Add ground turkey and cook until browned. Stir in chili powder, cumin, salt and cayenne pepper.
4. Transfer to large stock pot. Add crushed tomatoes, tomato paste, cilantro, jalapenos and garlic. Cook at medium heat and stir well.
5. Mix in remaining ingredients. Increase heat to high and bring to a rolling boil for 5 minutes. Reduce heat to medium and continue to cook for 7 minutes, stirring frequently.
6. Transfer chili to a 6 quart crock pot. Cook chili on high heat, covered for 6 hours.
7. Serve hot with sour cream and cheese on top.

What kind of soups are you cooking up for these cold and rainy days?

-Sarai

Tuesday, January 19, 2010

The Colorful Details


After an exciting weekend both our baby girls hit the sack early tonight, and I'm waiting for my hubby to get home from small group. What a perfect time to put in a little "Cosby Show," kick up my feet, and give you a look around our artsty partsy.

Hope you enjoy!


The activities...

a. We decorated a big easel at the front porch door welcoming all the little artists and directing them where to go. One of their favorite activities was decorating their own mini cakes. I made each one an artist "palette" from plastic plates and mini candy making cups. Food colored icing and sprinkles made for the paints.

b. H's uncle and fiance helped each two-and-up aged guest make their own candy bracelets... easy peasey with fruit loops and ribbon. The younger guests enjoyed activities like Color Wonder paint and markers, along with digging through balls for art supplies.

c. The warm weekend went wacky on me by pouring rain just as the party started, of course. Last minute Plan B kicked in... we hung paper with each child's first initial in the bathtub and let the kids spray paint in there. Just take spray bottles and fill them with washable tempera paint and lots of water.

d. Age old party favors like horns never get old among the 1-4 year old crowd! A buck a package from a local dollar store.

The decorations...

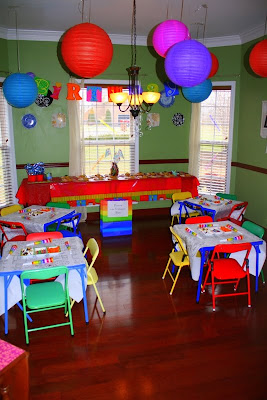
a. Reusable decor is my favorite and that which I'm willing to invest in. These lanterns get used all the time, and I picked them up at a Hobby Lobby end of the season clearance (from fifty to eighty cents each). The vinyl birthday banner from the top picture was a great find for only a buck... it has made an appearance at almost every party so far.

b. A roll of paper meant for coloring from Michael's made for easy tablecloths. With the 40% off coupon, this was also an easy splurge. In our neighborhood four of us have matching kiddo tables that we rotate for special events. Colorful trays in the middle of each one held crayons and snacks.

c. H and I had a ball making the "Staircase Exhibit." Many of our decorations came from the paper remnants and stash we have, and this was certainly no exception. We matted each piece of her artwork on black card stock and attached a title. Then we hung all of them along the stairwell banisters. It was great to see her so proud!

d. We used lots of around the home items like crayons. The centerpiece on the cake table was a big vase of them with simple monogrammed flags sticking out. We used left over sidewalk chalk and such everywhere. A big bag collected art supplies like this to donate to our nearby Children's Home. Each year we try to pick an organization we can give to in honor of the birthday girl.

Other details...

a. The favors were plastic pencil boxes filled with some artsy goodies. One of my favorite ways to party plan on a budget is to decide on the party's theme as far ahead of time as we can. This meant that back in the fall I got tons of these boxes on a mega-sale... a dime a piece! Any time we were out I quickly looked through clearance aisles to find the fillers. The Crayola candy canes came from an after Christmas sale.

b. Same goes for the food and paper products... the vibrant napkins were marked down from Michael's. We kept the menu simple according to the party girl's favorites... trail mix, baby carrots, and mini cakes. We had punch bowl cakes (recipes to come later), pretzels, popcorn, and a hot drink bar for the adults.

c and d. For the fun and cuteness of it, you just have the see the big three-year-old and her sister sporting their tie-dyed tees (& socks though not pictured!) Another 40% coupon for the kit!

A party like this has lots of advantages... interactive, affordable, and fun. Best of all, it allowed my daughter to be really active in both the planning and enjoying stages. That is one of my favorite parts!

Memories, oh memories... :)

~Katrina

Friday, January 15, 2010

Sneak Peak


We're up to our elbows in paint, dye and crayons so we'll see you soon after all the celebrating! :)

~Katrina

Tuesday, January 12, 2010

Files Are Fun...

...or something like that.

I understand that most people don't get quite as excited as I do when it comes to alphabetical order and everything having it's own place and label. And if I'm really honest here, I can admit that even with all the labeling and alphabetizing and cute file folders, I really dread anything that has to do with filing cabinets. With all the sorting and upkeep, it's always one of those things that I don't like doing, but am really glad to see the end result.

Chances are, most of you feel the same way. So, I thought I'd share my system for file upkeep. It's taken me a few years to get a hold on the best and easiest way to take care of all the papers, but I'm really pleased with what I've come up with. If you choose to adopt all or some of these ideas, you should know that it can take a little time to get it all set up, but it will be worth it in the end.

Even though I try to add new papers to their appropriate files about once a month, I only clean out and really organize my filing cabinet once a year (in January). In case I don't have time, or simply choose not to (which is usually the case!), I keep a couple of file folders on my desk labeled "Needs A File" (for papers that don't already have a corresponding folder in the cabinet and "Items To Be Filed" (for papers that already have a folder and just need to be filed).

You'll want to gather your supplies: hanging file folders, paper clips, binder clips, post-it notes, pen or marker, stapler and label maker.

It seems that I always have a pile of papers that need to be filed, so I start by sorting them. No fancy pants way to do this...I usually end up on the floor with the piles all around me.

All of our files are in alphabetical order. This makes them easy to find and takes the guesswork out of returning a file to the filing cabinet.

In each individual file, I have the papers in chronological order (oldest in the front, newest in the back so that when I take a stack of papers out, they are in order of bill date or appointment). Also, I have each year clipped together (either with a binder clip or paper clip). On the top paper in each year (usually the paper associated with January), I've attached a Post-It Note that contains the following information: The year of that stack's contents and the year that it can be destroyed. For example, in our electric bill folder, I know that I like to keep bills only from the past year (we don't need them for tax purposes). The Post-It Note says: "2009" and then "keep until January 2011".

Even though it takes some time, I try to go through every single file. When I take out a file, I see automatically if items are ready to be destroyed. When I do a clean out, I also make sure that the current year's files have been clipped together and labeled appropriately.

I can never remember how long I should keep things, but found this handy chart in an organizing magazine (I recommend making a copy or typing the information and placing it in the front of the filing cabinet for easy access.).

*TAX RECORDS: Copies of returns-forever; Supporting tax documents-at least 4 years.
*CHECKING ACCOUNT STATEMENTS: 1 month or until checks clear; Keep statements that support tax deductions with your tax records for the year.
*UTILITY BILLS: 1 month (unless you deduct for home office expenses; file with tax records).
*PAYCHECK STUBS OR DIRECT-DEPOSIT STATEMENTS: 1 year.
*CREDIT CARD STATEMENTS: 1-2 months or until charges are reconciled;Keep statements that support tax deductions with your tax records for the year.
*MORTGAGE INFORMATION: For as long as you own the property, plus 4 years for tax purposes.
*RECORDS FOR HOME IMPROVEMENTS, SALE OR PURCHASE OF PROPERTY: 4 years after the sale of the home or property.
*MEDICAL RECORDS: 4 or more years.
*INSURANCE POLICIES AND BILLS: Keep current policies and bills; discard canceled policies.
*INVESTMENT RECORDS: Keep initial purchase and year-end reports indefinitely.
*RECEIPTS FOR PURCHASES: 1 month, except for big-ticket items requiring proof-of-purchase for insurance.

After I've finished sorting through all the old files, I clean out that "Needs A File" folder from my desktop. I make labels for the new files needed and organize them alphabetically.

The last step is always my favorite: put on a great movie or your favorite TV show to watch while I shred the old documents :)

There are countless options for ways to organize files, and this is just one of them. Do you have a system that works for you? We'd love to hear about it! Leave a comment and share your ideas!

-Sarai

Monday, January 11, 2010

Soups Du Jour

Last week, I posted about our plan to eat lots of soup during the month of January in order to clean out the pantry and to try to stay warm in these less than normal cold temperatures (It was 13 degrees this morning when I woke up! YIKES!).

Yesterday, we spent less than an hour preparing the next 2 soups in our line up. We try to do one stove top soup and one crock pot soup so that we can do 2 at a time. Both these soups are full of veggies and have pretty quick prep times.

We did a Country Beef Stew that filled our 6 qt. crock pot. We had enough for a couple of meals this week, and froze 2 gallon bags for later use. Other than peeling the potatoes and cutting the onions, this recipe is SOOOOO EASY!!!

Country Beef Stew

*3 lbs. stew meat, cut into ¾ inch pieces


*1 ½ baking potatoes, cubed


*3 onions, sliced


*1 ½ cans sliced carrots


*1 ½ cans peas


*1 ½ cans tomato soup


*2 cups water


*1 ½ tsp. salt


*1/2 tsp. pepper


*2 bay leaves


1. Layer first 5 ingredients in a 6 quart slow-cooker.

2. Combine remaining ingredients; pour over layered ingredients.

3. Cover and cook on HIGH for 4 ½-5 hours, or until meat and veggies are tender.

4. Remove and discard bay leaf before serving.

Serves 6.


This stove top soup is really as well and is especially good when paired with some cheese quesadillas!!

Turkey Tortilla Soup

*1 cup purchased red or green salsa

*2 14-ounces cans reduced sodium chicken broth

*1 pound ground turkey, browned

*1 large zucchini, coarsely chopped

* Lime wedges (optional)

*Sour cream and Cilantro (optional)

1. In a large saucepan combinesalsa and chicken broth; bring to boiling over medium-high heat.

2. Add turkey and zucchini; heat through.

3. Serve in bowls topped with tortilla strips, lime wedges, and cilantro.

Serves 4.


Hope you and your family are finding ways to stay warm! What are your favorite hot comfort foods?

-Sarai

Thursday, January 7, 2010

new day for pb&j

Sarai is definitely on to something with her post below! Back in the fall, at the peak of my nauseousness, my Mom visited and cooked up a storm. I think she made about four big pots of soup to freeze. I cannot even tell you how many times we have been grateful for a warm, healthy meal from that stash. Don't even get me started on her defrosted, homemade yeast rolls! :)

Which gets me to thinking... wouldn't it be cool to make some pots of soup like that, some for you and some for a neighbor, friend, or someone who could use one? You never know how it just might bless that person when they need a warm, homemade meal. I think I'm going to make it a goal to make and/or share from what we have to give away. You could even get together with some friends and make an afternoon of it. Please do tell us about it if you do any soup sharing!

So what does that have to do with pb&j, besides for the fact that the old classic goes well with a bowl of delicious soup?

Well now that I'm feeling better, one of my new year's resolutions is to spice up the menu for the kids with healthful and yummy foods. I am hoping to share a few of the ways I'm discovering to do so over the next few weeks in case you too find yourself in a rut. First up? These simple guys:

Flipflops and Applesauce got the inspiration going with homemade uncrustables! This took no time at all and we fed our extra crusts to the birdies and bunnies in our backyard.
Or how about pb&j muffins?

They pack a healthy punch in their muffiny yumness. The secret is the carrot puree, which can be made from steaming 3-4 carrots for about 5-6 minutes and then blending them with a little water until smooth in consistency. This is much like baby food, so you could always grab a jar or two of that stuff and sneak it right in! You won't even taste it.

Preheat oven to 350 degrees. In a big bowl mix 1/2 cup creamy peanut butter, 1/2 cup carrot puree, 2 tbsp. of butter/trans fat free margarine, and 1/2 cup of brown sugar. Stir in 1/2 cup of plain yogurt and 1 egg white. Add 1 cup of whole grain all-purpose flour (or regular), 1/8 tsp. of salt, 1 tsp. of baking powder, and 1 tsp. of baking soda. Mix well and spoon into a greased or paper lined muffin tin. Top each one with a spoonful of jelly and bake for 20-25 minutes. This makes a dozen... double it and make some for now, freeze some for later.
Other ways to make the old standby new:
*Use mini waffles, mini pita pockets, or tortillas as the bread
*Make open faced sandwiches that can be decorated with fruit (think raisins, bananas, strawberries, and big smiley faces)
*Let the kids make shapes out the sandwich with cookie cutters
*Mix up the main characters... try out other nut butters, substitute honey, etc.


That should keep our pb&j's from being so... so... hmm... 2009? :)

~Katrina

Monday, January 4, 2010

Baby, It's Cold Outside

Let me start off by wishing you all a HAPPY NEW YEAR from Three Simple Girls!! We hope that 2010 has treated you well thus far and that you're looking forward to all that this year holds!

Here, in our neck of the woods, we've seen quite a few VERY cold days in a row with wind chills in the NEGATIVE degrees!! And this all falls on the heels of one of the worst snow storms we've seen in several years. So, needless to say, our days are filled with fires in the fireplace, big hooded sweatshirts, hefty jackets and an extra blanket on the bed and lots of warm cups of coffee. This has also put us in the mood for big batches of homemade soup. Soups are great because you can make them in HUGE quantities, you can freeze them, you can make them in a relatively healthy manner and they are perfect for a chilly winter night.

We spent about 2 hours yesterday afternoon making 2 soups and committed to doing the same for the next few weeks. We've picked about 7 different soup recipes to use to avoid getting tired of eating the same type of food for the whole month! Pairing the soups with salad, crackers, cornbread and grilled cheese sandwiches should give us enough variety. We figured we'd eat the soup for a meal, leave enough for a night of leftovers and freeze the rest. Depending on the recipe, we could end up with several nights of leftovers!! Spending 2 hours on day to have dinner for the entire week is a pretty good trade off, if I do say so myself!

Here are the 2 recipes we used for this week. First up is a healthy take on a Broccoli Cheddar Soup. It was actually pretty good!! It didn't make as much as we thought it would, so we'll probably eat it all before we get a chance to freeze it!

Broccoli Soup

*1/2 Tablespoon olive oil
*Shredded Sharp Cheddar Cheese
*5-8 cups Broccoli Florets
*1/2 cup Finely Chopped Celery
*1 Large Onion, Chopped
*Salt
*Pepper
*1 Small Potato
*1 Bay Leaf
*1/2 Teaspoon Dried Oregano
*1 quart (about 32 ounces) Chicken Broth
1. Cook celery and onion, seasoned with salt and pepper, in olive oil at medium heat for about 10 minutes.
2. Peel and slice potato and at to the pot. Add the bay leaf, oregano and broth and bring to boil quickly over high heat.
3. Simmer until vegetables are completely tender, about 15 minutes.
4. Add broccoli and simmer until tender, about 5 minutes.
5. Remove bay leaf and puree the soup in a blender.
**You can place pureed soup back into pot and stir in 1 cup of cheese while hot. **
6. Serve topped with cheese.
Serving Size: 1.5 cups Serves: 6
104 calories, 3 g fiber, 3 g fat

This next recipe filled a 6 qt. crock pot, so be prepared for LOTS of leftovers!!

Crock Pot Potato Soup

*5 lbs. Potatoes, Peeled and Cubed
*1 Small Onion, Chopped
*8 oz. Cream Cheese, Softened
*3-14.5 oz. cans of Chicken Broth
*2 Can Cream of Chicken Soup
*1/4 Teaspoon Pepper
*Bacon, Cheese, Sour Cream and Scallions for garnish
1. Put potatoes and onion in crock pot.
2. Combine cream cheese, chicken broth, soup and pepper and add to crock pot.
3. Cover and cook on low for 8-10 hours or on high for 4-5 hours.
4. After cooking time, mash potatoes for a thicker soup.

The best way I've found to freeze soups is to put them in gallon or quart size storage bags. Lay them flat on a baking sheet and put them in the freezer until frozen. Once they're frozen, you can stand them up or move them around as needed. When they thaw, you can easily pour them into a pot or bowl to reheat.

I'll try to post the recipes we use for the next few weeks. Does anyone have any great soup recipes you think we should share? Anyone want to join us on this soup for a month plan?

Stay warm!!

-Sarai

Related Posts with Thumbnails