Showing posts with label Ideas for Fall. Show all posts

Thursday, October 14, 2010

Treat or Treat

My new favorite pumpkin cupcake recipe. The household favorite, I should say, seeing as how I finally had to hide the batter and the finished products from our soon-to-be whiskered trio of girls.

2 cups of whole wheat flour
1 tsp. baking soda
1 tsp. baking powder
1 tsp. salt
1 tsp. cinnamon
1 tsp. ginger
1/4 tsp. nutmeg
1 cup brown sugar
1 cup Sugar in the Raw or regular sugar
2 sticks butter- softened
4 eggs
1 can of pumpkin- 15 oz.
Optional: handful (or two or three) of chocolate chips

Mix dry ingredients. Mix wet ingredients except pumpkin. Mix dry and wet together, then fold in the pumpkin and chocolate chips. Bake at 350 degrees for about 15 min. Makes about two dozen.

And you do know this trick, don't you? Fill a plastic baggy with icing, snip off a tiny bit at the end... your very own piping bag! You know, so you can top those cupcakes with cream cheese or chocolate frosting.
Of course, you need something to wash it down with. Something pumpkiny at that. Here's another treat you can share with the kiddos because, despite its name, it has no caffeine or coffee in it.

Pumpkin Latte:
1/2 cup pumpkin
1 cup milk
1/2 tsp. cinnamon
2 tbsp. (or more) pure maple syrup
1 1/2 cups ice
Optional: 1-2 tbsp. natural sugar if the above isn't sweet enough for you

Blend together and serve... with a dollop of whipped cream should you want pumpkin pie in a cup!

~Katrina

Monday, October 11, 2010

Pumpkin Pizza

I am a fan of all things pumpkiny in taste... but perhaps pizza is taking it a little too far?? :)

Still if we can't put pumpkin in it, surely we make it into a pumpkin. Our girls thought it was a fun idea for a Friday family night.

Collect a few simple ingredients... pre-made or homemade pizza dough (we used the whole wheat kind from Trader Joes), sauce, pepperoni cut into semi-circles and triangles, and sliced olives.
Oh and, mercy, cheese is missing from this picture. The horror! Of course, you need cheese. Melted until bubbly, delicious cheese.

Sprinkle a little flour on your surface and roll out the dough. Use a pumpkin shaped cookie cutter to make your jack-o-lantern outlines. Top with sauce and cheese... then pepperoni eyes and mouths.
Bake for about 15 minutes until dough is firm and cheese melted. Dressing up and peering through the oven door optional.


Enjoy!
****

While on the subject of eating, my eldest daughter started pre-school this year. We searched around for a fun and practical lunch system, and I was so glad to stumble upon Easy Lunch Boxes! I love the compartments, the cut down on waste, the fact that it comes with four boxes making it great for family picnics, the BPA freeness, the dishwasher safeness... AWESOME! Makes packing a lunch pretty fun, I must admit. Even end of the month, gotta get to the store leftovers!


~Katrina

Thursday, September 23, 2010

Fall Subway Art

Happy Fall, Y'all! While it's still getting pretty warm during the day here in Western North Carolina, the early mornings and late nights are cool enough to get me good and excited about some fall!
I've seen Subway art popping up all over blogland these days. Most of it seems to be created with some fancy Cricut or Silhouette machines and while I don't own one of those, I do have a computer, a printer and Microsoft Publisher. I love what a big statement some simple words can make.


Want to make your own Subway art? Simply use your favorite publishing program to combine words that remind you of a central theme...like seasons, holidays, or even relationships. Then, print it out, stick it in a frame and you've got some super easy, super cheap Subway art!


Need some other ideas to get you in the mood for Fall? Try these.

-Sarai

Sunday, November 22, 2009

Serving Up Sides & Giveaway Reminder

Whew... things are busy over here, but I promised so here goes... :)

Thankfully a neighbor plans to smoke our turkey all day Wednesday, so that takes a huge (like 20-lb.!) weight off my shoulders. Instead I can focus on the other goooood stuff... side dishes, baby!

Maybe one of these can help fill in a gap on your menu...

1. The kid-in-all-of-us friendly option... mac and cheese. A couple of years back when it was my side of the family's turn for Thanksgiving, I was determined to make a crock pot recipe that got rave reviews. I tried it for the first time on the day and, let's just say, noodle soup wasn't exactly my cup of cheese.

This time my wiser, older self (ha!) tried a new recipe ahead of time. The family loved it! Score... finally a homemade mac and cheese that's a keeper. Our only change was one cup of cottage cheese instead of two.

2. The more adult friendly option... pear and walnut salad. We try out all kinds of salads pretty frequently, but I taste tested this combo for my hubby's recent birthday. I had to use up a bunch of pears given to me, so that was my inspiration. Two for two... more rave reviews!

In a big bowl mix arugula and/or Romaine lettuce, sliced pears, and thinly sliced red onion. Toss with a raspberry dressing (our FAVE from the bottle variety is Trader Joes). Serve each bowl individually and top with walnuts and crumbled bleu or feta cheese.

3. The everybody crowd pleaser... sweet potato custard. A couple of years back I tried Rachael Ray's spin on the old sweet potato classic. The maple syrup on top helps this one to stick around. In fact, if you have that ingredient already, this is a pretty easy addition to any menu.

4. Whoa, almost forgot something... the BREAD! Courtesy of the Pioneer Woman this year. No kneading required, and I already had all the ingredients on hand... tested this recipe yesterday and it made so many I went ahead and froze them for the holiday. If they make it that long! :) Mine didn't turn out quite so pretty with the three cute sections, but still keepers.

Nothing too terribly complicated and all too delicious!

Come quickly, Thursday...

And happy, happy Thanksgiving from the three of us to you and yours!
Katrina

... don't forget that giveaway below!!! You have until Thanksgiving. The necklace is so beautiful just like its creator! I'd be lying to say I'm not drooling over it myself; instead, I just can't wait to see who wins it!

Wednesday, November 18, 2009

Tablescape Thursday

A special welcome to the Between Naps on the Front Porch readers. Thanks for popping by to check out us simple girls!

It's almost Thanksgiving! This is the first year we've been responsible for mostly the whole shebang, so I've been little-by-little getting things together. Since we don't plan to use our formal dining room until then, the adult's table is pretty well set. Minus the whole ironing stuff thing! (How, oh how, did my grandmother even iron people's underclothes? Saint of a woman!)

So glad you're here to check out this simple and affordable tablescape. As many of our other readers already know, this is a favorite combo of ours to be sure. (Forgive the bad lighting as it's a glarey kind of day outside... so much prettier when those blinds are open wide!)

I went with the traditional fall colors grounded by a lot of black, mostly because this speaks to our house in general. Especially the dining room!
The centerpiece is an old urn I found at a local antique store for under ten dollars. I love it and use it for almost all of the seasons. The inside is stuffed with funky gourds, pumpkins, and such... picked up for a quarter a piece at Wal-Mart. Speaking of store finds, I found those napkins several years back at Garden Ridge also four for a dollar!
During the same trip to Wal-Mart, since it's not a convenient stop for me, I picked up two cheap-o packages of split peas and beans. I layered them in tiny juice glasses found at a yard sale for a quarter a piece and popped tiny tealights right in the middles. Each place setting, along with table's center, gets some candlelight this way. And I'm realizing I'm getting a lot of bang for all those quarters!
Each place setting also gets a simple place card... scrapbook paper, letters, and stickers. All I need to do now is add a little hole punch with gold, black, and silver ribbons to tie everything together. A couple of years ago I did this same kind of idea except with little gift tags tucked into brown paper sleeves... inside each one was a reason we were thankful for the guest. We have another thankful tradition I'd like to begin this year, so I just stuck with the names.From the lighting fixture, I hung candle rings turned mini wreathes with two coordinating colors of ribbon. The picture doesn't really show it, but some of the small jewels really pop against the dimmed bulbs and candlelight.
Great places to get beautifully cheap scrapbooking supplies are dollar stores or Big Lots. Same goes for pillar or tealight candles.
As for an adorable assistant photographer, replete with bed head at three in the afternoon, I can be of no further assistance. Except to say that she's at the top of my thankful list. :)

Hope you have lots of joy around your table this Thanksgiving!
Katrina

ps... Check back, hopefully this weekend, for some easy side dish recipes. Yum!

Tuesday, November 17, 2009

At the Kids' Table

I'll squeeze in a peek at the grown-up's table on Thursday. In case you need any last minute details... in the nick of time, of course. I can promise you it's all simple, cheap, and easy. Have you tired yet of that combination when it comes to us?

I can hardly wait until my niece and nephews arrive next week! They have a twelve plus hour drive to get here, and we appreciate the effort made by their family to spend Thanksgiving with us. Though the kids' table isn't officially set up yet, here are some quick ways to give it personality.

**Fun paper products...
Don't have a pic of this one... but check out your dollar stores! I got some sweet little turkey plates and cups with leaf napkins for a whopping three bucks.

**Opportunities to color while they eat...
http://www.alphamom.com/holiday/2009/11/thanksgiving_day_kids_table_cr.php

**Goofily cute centerpiece...
http://littlepageturners.blogspot.com/2009/11/turkey-day-this-is-turkey.html

**Sweet place cards that make good of all that leftover candy (gonna put just a simple white card underneath each one)...
http://theidearoom.blogspot.com/2009/11/oreo-cookie-turkeys.html

When it's time to make the long trek home, I like to send along a little pack of goodies for each kid. Us Simple Girls have a much more elaborate version done up for our annual weekend away in the mountains (B & S, do you have any pics of those to share?). For the kiddos, I keep the travel bags silly and simple but full of stuff I know they'll enjoy.

Contents: Scribble-Bear (I want one!) and a pad of paper (top sheet has a little see-you-later note from us), candy necklace, box of raisins, bag of Skittles, fruit strip, and a baggie of Goldfish.

For less than six bucks total, there's a final reminder of us to them... and hopefully a little extra sanity for their parents! :)

~Katrina

Sunday, November 8, 2009

Procrastinator's Pumpkin

We had a lot going on the week prior to the 31st. So whether you are procrastinators like us or hyper organized such that you plan a year in advance... welcome! :)

This year at our fall bash, we gave out a little poem that inspired our simple carving efforts. (Be sure to click on the picture to enlarge the sweet message!)

While I scooped out all the fun insides of the big pumpkin, the girls painted in (or all over, rather) the symbols on the ones they picked from the patch.

Then we cut out our roughly sketched design as we read the poem together.
To celebrate a carved pumpkin finally gracing our front porch, we did what any self respecting artist does... started baking!
These itty bitty cookies are colorful, pretty easy, and yummy! Check out the recipe here.

As for these legendary cream cheese pumpkins... I'll have to work on the specifics. Nana and her lovely assistants baked 'em up. And, I'm sorry to say, Nana never measures a thing!

Thanksgiving ideas coming soon...
~Katrina

Friday, October 30, 2009

Final Touches

Goodwill shirts stenciled. Roughly stenciled, but done all the same.


Yes, my hubby is such a good sport. Yes, I definitely plan to keep him!

See... :)

"It's the GREAT PUMPKIN, Charlie Brown!"

With a quack, quack here and a moo, moo there...


Dollar Store angel halos transformed with ladybugish style.

We're ready to roll! Almost.

Except for that whole house preparing thing. Thank goodness Nana is in town!

Tomorrow is our second annual CHILI-ing Fall Fun. The neighborhood children and their families come over to our place in the evening. Chili for the adults, hot dogs for the kiddos, a bonfire out back, and welcoming front porch lights along the streets calling for candy overload afterwards.

Fall time lovely!

How will you spend your Saturday?

Have a safe one,
~Katrina

Sunday, October 25, 2009

Easy as Pie

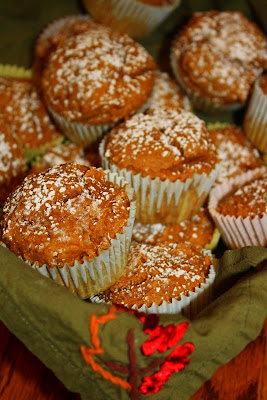
Muffins, actually.

But these simple, sweet things just might surprise you.

While Brooke and Sarai recover from an amazing weekend of serving college aged women, I thought I'd pass along a recipe that I'm pretty sure one of them gave to me some time back.

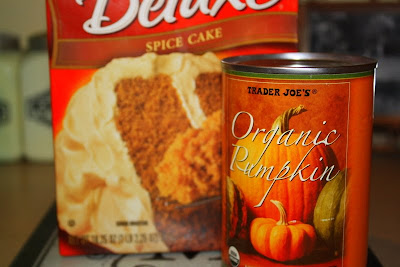
Take this and this and mix together until well combined.

Do NOT even turn that spice cake mix box around. Pay no attention to the directions on the back of it. The can of pumpkin and the cake mix. Period.

Bake at 350 degrees for about 15-17 minutes for approximately 8-12 pumpkin muffins (depending on how big you like them!)

Easy enough for any ole morning, but pretty enough for special guests!

Enjoy,
~Katrina

Friday, October 16, 2009

Counting Sheep... I Mean Crafts

The house is quiet, and I just can't sleep. My wheels are turning for a number of reasons, so I decided I could use some crafting therapy.

This little bloggy idea is just what the doctor ordered!

For around five bucks the girls now have some buckety cuteness to carry for, what I hope is, years to come.

I started with this plus scissors and several more glue sticks:
Now I'll admit, I'm not a fan of scary and weird when it comes to fall time fun. It's just not our thing. And I didn't have two gallons of ice-cream lying around, which would have been semi-horrifying for me to eat right now anyway. These buckets simply had the market on being black and cheap, a perfect combo for this project.

Felt hot glued and trimmed...
Ribbon hot glued to touch up the edges and tied onto the handles. Next year, I'll replace the ladybug print with something different...

Initials stamped into place. I bought two of these monograms for about seventy-five cents a year ago at a scrapbook superstore. One for each of the girl's names, and they come in handy all the time...
Wait! I went and made the skeletons mad or something. Smudged printing on top of the ribbon to boot. Not exactly what I had in mind.

Hmmm, maybe a bit of brain food could help...
Works every time! So glad I opted to pay the additional twenty cents for another sheet of black felt. Always, always get extras when you hear that little voice saying, "You know, you might mess up???"
Better, I think! I reprinted the letter on extra felt and framed out the piece with ribbon and four small buttons. Crisis avoided after all!
Thanks, Brown Paper Packages! Surely my sleep will be sweeter now, but I'm sure gonna get some before attempting the next bucket on my list. :)

Happy Weekend,
~Katrina

Thursday, October 8, 2009

No Place Like Home

Of course, that title has nothing to do with ladybug shoes.

But the shoes themselves just scream it, don't you think?

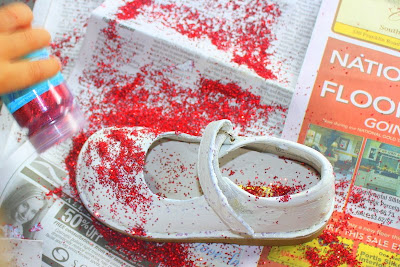
Thanks to Modge Podge Rocks for sharing this found idea. And thanks to you, dear Hobby Lobby, for having your glitter 50% off this week. Take some Modge Podge, glitter (sprinkles, as my little girls says :), a brush, and shoes Lysol'd to bits from the Goodwill. Apply the podge liberally and cover in glitter until you're satisfied with the result.


Ta-DA!


Since we couldn't quite wait until they were completely dry to try on them on, I'm off to do a touch up job while the girls nap.

Can't wait again to see these ladybug toes in all their sprinkly glory at the end of the month!
~Katrina
Related Posts with Thumbnails